Salt Block Cooking: A Beginner's Guide to Getting Started
Salt block cooking represents one of the most exciting and visually stunning culinary techniques you can master in your kitchen. Using thick slabs of pure Himalayan pink salt as both cooking surface and seasoning agent, this ancient method creates dishes with unparalleled flavor depth and presentation appeal.
Whether you're a seasoned chef looking to expand your repertoire or an adventurous home cook seeking new challenges, salt block cooking offers a unique way to elevate your culinary creations. This comprehensive guide will walk you through everything you need to know to get started, from selecting your first salt block to mastering advanced techniques.
What is Salt Block Cooking?
Salt block cooking involves using thick slabs of Himalayan pink salt as cooking surfaces. These blocks, typically measuring 8x8 inches or 12x8 inches and about 1.5 to 2 inches thick, can be heated to high temperatures for grilling, searing, and sautéing, or chilled for serving cold dishes like sushi, cheese, or desserts.
The salt block serves multiple purposes simultaneously: it acts as a cooking surface, imparts subtle mineral flavors to food, provides even heat distribution, and creates a stunning presentation piece that's sure to impress guests. The natural antimicrobial properties of salt also make these blocks naturally hygienic cooking surfaces.
Fun Fact: Salt block cooking has been practiced for centuries in the Himalayan regions of Pakistan and India, where local cooks discovered that cooking on salt slabs enhanced both flavor and food preservation.
Choosing Your First Salt Block
Selecting the right salt block is crucial for successful cooking experiences. Here's what to look for when making your purchase:
Size Considerations
Salt blocks come in various sizes, each suited for different purposes:
- 8x8x1.5 inches: Perfect for beginners, serves 2-4 people
- 12x8x1.5 inches: Ideal for families, serves 4-6 people
- 16x12x2 inches: Best for entertaining, serves 6-8 people
Quality Indicators
When selecting a salt block, examine these quality factors:
- Color: Look for natural pink to deep red coloration
- Density: The block should feel heavy and solid
- Surface: Choose blocks with smooth, even surfaces
- Cracks: Avoid blocks with visible cracks or fissures
- Origin: Ensure authentic Himalayan sourcing
Thickness Matters
Thicker blocks (1.5-2 inches) are generally better for cooking as they:
- Retain heat longer
- Provide more even temperature distribution
- Are less likely to crack under thermal stress
- Offer better durability for repeated use
Essential Equipment and Setup
Before you begin salt block cooking, gather the necessary equipment to ensure safe and successful results:
Required Equipment
- Salt block: Your primary cooking surface
- Heat source: Gas grill, electric burner, or oven
- Metal spatula: For flipping and moving food
- Tongs: For handling hot items safely
- Oven mitts: Heat-resistant gloves for safety
- Trivet or cooling rack: For resting the hot block
- Scraper or brush: For cleaning after use
Optional but Helpful Tools
- Infrared thermometer for temperature monitoring
- Salt block holder or frame for stability
- Silicone brush for oil application
- Wooden serving utensils to prevent scratching
Preparing Your Salt Block for First Use
Proper preparation is essential for the longevity and performance of your salt block. Follow these steps before your first cooking session:
Initial Cleaning
- Rinse the block briefly with cool water
- Pat completely dry with paper towels
- Allow to air dry for at least 24 hours
- Ensure no moisture remains before heating
⚠️ Important Safety Note
Never soak your salt block in water or put it in the dishwasher. Excessive moisture can cause cracking when heated. Always ensure your block is completely dry before applying heat.
Seasoning Process
While not required like cast iron seasoning, some cooks prefer to "season" their salt block:
- Heat the block slowly to 200°F
- Lightly brush with a high-heat oil (avocado or grapeseed)
- Allow to cool completely
- Wipe clean with a dry cloth
Heating Techniques and Temperature Control
Proper heating is the most critical aspect of salt block cooking. Rapid temperature changes can cause cracking, so patience is essential.
The Gradual Heating Method
Always heat your salt block gradually to prevent thermal shock:
- Start Low: Begin at the lowest heat setting
- Increase Gradually: Raise temperature every 15-20 minutes
- Monitor Progress: Use an infrared thermometer if available
- Reach Target: Aim for 300-500°F depending on your recipe
Heat Source Options
Different heat sources offer various advantages:
- Gas Grill: Best for high-heat searing, easy temperature control
- Electric Stovetop: Good for controlled heating, indoor convenience
- Oven: Excellent for even heating, safe for beginners
- Outdoor Fire: Traditional method, requires experience
Temperature Guidelines
Different foods require different temperatures:
- 300-350°F: Vegetables, fish, delicate proteins
- 400-450°F: Chicken, pork, medium-density foods
- 500°F+: Beef steaks, high-heat searing
Cooking Techniques and Methods
Once your salt block is properly heated, you can employ various cooking techniques to create amazing dishes:
Searing and Grilling
The high heat capacity of salt blocks makes them excellent for searing:
- Preheat block to 450-500°F
- Lightly oil food, not the block
- Place food on block and avoid moving initially
- Allow natural browning and flavor development
- Flip once for even cooking
Slow Cooking and Roasting
Lower temperatures work well for:
- Vegetables that need gentle cooking
- Fish and seafood
- Delicate proteins
- Foods requiring longer cooking times
Cold Applications
Chilled salt blocks are perfect for:
- Serving sushi and sashimi
- Cheese and charcuterie presentations
- Ice cream and frozen desserts
- Cold appetizers and canapés
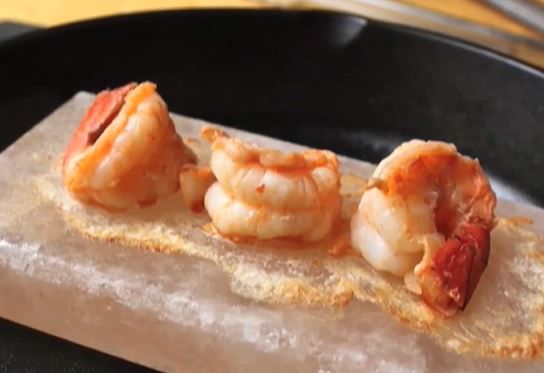
🍤 Quick Recipe: Salt Block Shrimp
Ingredients: 1 lb large shrimp, 2 tbsp olive oil, 1 tsp garlic powder, black pepper to taste
Method: Heat salt block to 400°F. Toss shrimp with oil and seasonings. Cook on block for 2-3 minutes per side until pink and cooked through. The salt block will provide perfect seasoning!
Foods That Work Best on Salt Blocks
While you can cook almost anything on a salt block, some foods are particularly well-suited to this method:
Excellent Choices
- Steaks and beef: Develop beautiful crusts and mineral flavors
- Fish and seafood: Natural pairing with salt enhances ocean flavors
- Vegetables: Caramelization is enhanced by salt contact
- Chicken and poultry: Even cooking and flavor penetration
- Eggs: Create unique breakfast presentations
Foods to Approach with Caution
- Very salty foods: May become over-seasoned
- Delicate herbs: Can wilt quickly on hot surfaces
- Acidic foods: May react with salt over time
- Wet marinades: Can cause excessive splattering
Cleaning and Maintenance
Proper care extends the life of your salt block significantly:
Immediate Post-Cooking Care
- Allow block to cool completely (2-3 hours)
- Scrape off food residue with a metal spatula
- Use a stiff brush for stubborn spots
- Wipe with a barely damp cloth if necessary
- Dry thoroughly before storage
Deep Cleaning Process
For thorough cleaning when needed:
- Use coarse salt as an abrasive cleaner
- Scrub with a stiff brush or scraper
- Rinse very briefly if absolutely necessary
- Dry completely for 24+ hours
- Store in a dry location
💡 Maintenance Tip
Your salt block will develop a patina over time, changing from pink to darker colors. This is normal and actually indicates a well-seasoned, experienced cooking surface. Don't try to restore the original color.
Troubleshooting Common Issues
Even experienced cooks encounter challenges with salt blocks. Here are solutions to common problems:
Cracking
Causes: Rapid temperature changes, moisture, manufacturing defects
Prevention: Heat gradually, ensure dryness, buy quality blocks
Solution: Small cracks can often be used safely; large cracks require replacement
Uneven Heating
Causes: Inadequate preheating, uneven heat source, block thickness variations
Solution: Longer preheating time, rotate block during heating, use even heat sources
Over-Salting
Causes: Too much contact time, pre-salted foods, high block temperature
Solution: Reduce cooking time, avoid additional salt, oil foods lightly
Advanced Techniques and Tips
Once you've mastered the basics, try these advanced techniques:
Temperature Zones
Create different temperature zones on your block by heating unevenly, allowing for simultaneous cooking of different foods requiring various temperatures.
Flavor Layering
Cook aromatic ingredients first (garlic, herbs) to infuse the block with flavors that will enhance subsequent dishes.
Presentation Techniques
Use the block as a serving platter, bringing it directly to the table for dramatic presentation. The retained heat will keep food warm throughout the meal.
Conclusion
Salt block cooking opens up a world of culinary possibilities that combine ancient techniques with modern creativity. While there's a learning curve involved, the unique flavors, stunning presentations, and cooking versatility make the effort worthwhile.
Remember that mastery comes with practice. Start with simple recipes, focus on proper heating techniques, and gradually experiment with more complex dishes. Your salt block will develop character over time, becoming a treasured tool in your culinary arsenal.
Most importantly, embrace the process and enjoy the journey. Salt block cooking is as much about the experience and presentation as it is about the final dish. With patience, practice, and proper technique, you'll soon be creating memorable meals that showcase the unique magic of cooking on pure Himalayan salt.